Kamis, 02 Januari 2025

L2TP VPN ISSUE - The network connection between your computer and the VPN server could not be established because the remote server is not responding

This new year started with issue from user that could not connected to L2TP VPN that i've setup before. This issue happend since i move VPN router under Firewall and do NAT 1:1 on it. my user reported that it shows an error below


The network connection between your computer and the VPN server could not be established because the remote server is not responding. This could be because of one of the network devices (e.g, firewalls, NAT, routers, etc) between your computer and the remote server is not configured to allow VPN connections.

After searching it at microsoft forum, i found that caused by default since windows Vista and Windows Server 2008 that don't support IPSEC NAT-T security associations to servers that are behind a NAT device. If the virtual private network (VPN) server is behind a NAT device, a Windows Vista or Windows Server 2008-based VPN client computer can't make a Layer 2 Tunneling Protocol (L2TP)/IPsec connection to the VPN server. This scenario includes VPN servers that are running Windows Server 2008 and Windows Server 2003.

Because of the way in which NAT devices translate network traffic, you may experience unexpected results in the following scenario:

  • You put a server behind a NAT device.
  • You use an IPsec NAT-T environment.

If you must use IPsec for communication, use public IP addresses for all servers that you can connect to from the Internet. If you must put a server behind a NAT device, and then use an IPsec NAT-T environment, you can enable communication by changing a registry value on the VPN client computer and the VPN server.

Based on microsoft learn, the solution for this issue was simple. Just add a registry value named AssumeUDPEncapsulationContextOnSendRule.

follow these steps:

  1. Log on to the Windows Vista client computer as a user who is a member of the Administrators group.

  2. Select Start > All Programs > Accessories > Run, type regedit, and then select OK. If the User Account Control dialog box is displayed on the screen and prompts you to elevate your administrator token, select Continue.

  3. Locate and then select the following registry subkey:

    HKEY_LOCAL_MACHINE\SYSTEM\CurrentControlSet\Services\PolicyAgent

  4. On the Edit menu, point to New, and then select DWORD (32-bit) Value.

  5. Type AssumeUDPEncapsulationContextOnSendRule, and then press ENTER.

  6. Right-click AssumeUDPEncapsulationContextOnSendRule, and then select Modify.

  7. In the Value Data box, type one of the following values:

    • 0

      It's the default value. When it's set to 0, Windows can't establish security associations with servers located behind NAT devices.

    • 1

      When it's set to 1, Windows can establish security associations with servers that are located behind NAT devices.

    • 2

      When it's set to 2, Windows can establish security associations when both the server and VPN client computer (Windows Vista or Windows Server 2008-based) are behind NAT devices.

  8. Select OK, and then exit Registry Editor.

  9. Restart the computer.

And now my user can connected to our L2TP VPN without error anymore.

Gracias.

Source information : here
Read More »

Kamis, 02 November 2023

Windows 11 22H2 Issue to connect legacy SQL Servers

We've got a legacy SQL Server (MS SQL 2005) running in our environment, and everything was fine until one of our user use Windows 11 with latest update (22H2).

A connection was successfully established with the server, but then an error occurred during the login process. (provider: SSL Provider, error: 0 - An existing connection was forcibly closed by the remote host.) (Microsoft SQL Server, Error: 10054)

The answer most likely is updating my Cipher Suite, Windows 22H2 changed the default TLS Cipher Suites. The following were removed from the default "TLS_DHE_RSA_WITH_AES_256_GCM_SHA384,TLS_DHE_RSA_WITH_AES_128_GCM_SHA256,TLS_RSA_WITH_3DES_EDE_CBC_SHA" per article https://learn.microsoft.com/en-us/windows/win32/secauthn/tls-cipher-suites-in-windows-11

I ran into the same issue, so I just updated the SSL Cipher Suite per instructions https://support.microsoft.com/en-us/topic/update-to-add-new-cipher-suites-to-internet-explorer-and-microsoft-edge-in-windows-548427db-ed06-5521-fe8b-d525ab573022follow these steps:

  1. At a command prompt, enter gpedit.msc, and then press Enter. The Local Group Policy Editor is displayed.

  2. Go to Computer Configuration > Administrative Templates Network > SSL Configuration Settings.

  3. Under SSL Configuration Settings, select SSL Cipher Suite Order.

  4. In the SSL Cipher Suite Order pane, scroll to the bottom.

  5. Follow the instructions that are labeled How to modify this setting.

  6. Restart your windows to apply config.

The list I used was the one that was used for Windows prior to the 22H2 (22621.819) update.

TLS_AES_256_GCM_SHA384,TLS_AES_128_GCM_SHA256,TLS_ECDHE_ECDSA_WITH_AES_256_GCM_SHA384,TLS_ECDHE_ECDSA_WITH_AES_128_GCM_SHA256,TLS_ECDHE_RSA_WITH_AES_256_GCM_SHA384,TLS_ECDHE_RSA_WITH_AES_128_GCM_SHA256,TLS_DHE_RSA_WITH_AES_256_GCM_SHA384,TLS_DHE_RSA_WITH_AES_128_GCM_SHA256,TLS_ECDHE_ECDSA_WITH_AES_256_CBC_SHA384,TLS_ECDHE_ECDSA_WITH_AES_128_CBC_SHA256,TLS_ECDHE_RSA_WITH_AES_256_CBC_SHA384,TLS_ECDHE_RSA_WITH_AES_128_CBC_SHA256,TLS_ECDHE_ECDSA_WITH_AES_256_CBC_SHA,TLS_ECDHE_ECDSA_WITH_AES_128_CBC_SHA,TLS_ECDHE_RSA_WITH_AES_256_CBC_SHA,TLS_ECDHE_RSA_WITH_AES_128_CBC_SHA,TLS_RSA_WITH_AES_256_GCM_SHA384,TLS_RSA_WITH_AES_128_GCM_SHA256,TLS_RSA_WITH_AES_256_CBC_SHA256,TLS_RSA_WITH_AES_128_CBC_SHA256,TLS_RSA_WITH_AES_256_CBC_SHA,TLS_RSA_WITH_AES_128_CBC_SHA,TLS_RSA_WITH_3DES_EDE_CBC_SHA,TLS_RSA_WITH_NULL_SHA256,TLS_RSA_WITH_NULL_SHA,TLS_PSK_WITH_AES_256_GCM_SHA384,TLS_PSK_WITH_AES_128_GCM_SHA256,TLS_PSK_WITH_AES_256_CBC_SHA384,TLS_PSK_WITH_AES_128_CBC_SHA256,TLS_PSK_WITH_NULL_SHA384,TLS_PSK_WITH_NULL_SHA256

Disclaimer: Please be advised that this response is to answer the question that was given and obviously does not follow best practice procedures. Microsoft disabled this encryption for a reason. If you are like me and have older servers that need to keep running while you come up with a long-term solution to discontinue them then the above solution will keep you operational.

Read More »

Senin, 16 Oktober 2023

CITRIX : Unable to launch your application. Contact your help desk with the following information: Cannot connect to the Citrix XenApp server. There is no Citrix XenApp server configured on the specified address.


Our client facing problem with citrix apps, it always show an error below

Unable to launch your application. Contact your help desk with the following information: Cannot connect to the Citrix XenApp server. There is no Citrix XenApp server configured on the specified address.


This happen when we move the server to new cluster Data Centre.

From the error message, it said that citrix ICA had a problem with network interface.  And regarding our colleague statement, he had change the network interface to solve another issue.


To solve this issue, i do the following :

1. Open terminal service configuration at you Citrix Server


2. From connection, see ICA-tcp connection, and open it properties.

3. Select network adapter tab. Change network adapter to interface now active. Appy and OK.


4. Restart Citrix Service Manager services


5. Back to ICA-tcp properties, and rollback network adapter into “all network adapter configured” 

6. Restart again  Citrix Services Manager services


Now the issue has solve.


Read More »

Jumat, 13 Oktober 2023

CITRIX APPS : The following requested video mode was not available

My colleague ask me about error from her citrix terminal, when she try to open application from citrix apps, it always show an error like picture below.

"The following requested video mode was not available: 1920 x 1080 x 24 BPP

The video mode has been set to the following mode: 1847 x 1038 x 24 BPP

Video mode restricted by administrator. " 


This was due to the fact that not enough memory had been allocated to the graphics for individual client sessions to support the resolution on larger monitors. This can be resolved by modifying the Farm ICA Display settings in the Citrix Access Management Console. Right click on the Farm object in the Citrix Access Management Console and choose ‘Properties’. Then under ‘Server Default’, ICA, click on ‘Display’. Change ‘Maximum memory to use for each sessions’s graphics’ from the default (in my case 5625) to 8192 as shown below:


After increasing the memory available for each sessions graphics, you should find that Citrix is able to support the higher resolutions OK.


Read More »

Rabu, 17 Mei 2023

EVENT : InfoKomputer Innovate Menjaga Data Resiliency di Era Penuh Disrupsi


Data memegang peran penting dalam perusahaan saat ini. Sebuah studi menyebut, 58% perusahaan menjadikan data sebagai bagian penting dari proses pengambilan keputusan. Tidak heran jika 64% perusahaan memiliki target mengembalikan operasional perusahaan kurang dari satu jam setelah terjadi disrupsi.

Karena itu, penting bagi setiap organisasi untuk memastikan keandalan infrastruktur datanya dalam menghadapi disrupsi, baik dari sisi internal maupun eksternal. Perusahaan harus memahami bagaimana membangun infrastruktur data yang tangguh, langkah preventif apa yang bisa dilakukan, serta bagaimana strategi untuk mengatasi disrupsi yang terjadi.
Pada seminar ini, akan hadir narasumber yang memiliki pengalaman panjang seputar data resiliency. Mereka akan berbagi tentang strategi dan best practice menjaga keutuhan data, seperti saat terjadi data loss, data breach, sampai kegagalan sistem. 

Acara akan diadakan pada:

·  Hari: Selasa, 23 Mei 2023

·  Waktu: 09.00-12.00 WIB

·  Lokasi: Aurum Room, Lantai 2 Pullman Hotel Thamrin CBD

Mari bergabung di seminar ini untuk mendapatkan insight menarik dari pakar di bidangnya, yang akan membantu memastikan keutuhan data dan keberlangsungan bisnis perusahaan Anda.


DAFTAR DISINI

Read More »

Senin, 17 April 2023

EVENT : Fortinet Accelerate Asia 2023

 Kami ingin mengundang Bapak untuk menghadiri acara "Fortinet Accelerate Asia 2023" yang akan diselenggarakan pada:

Hari                          : Selasa, 30 May 2023

Main Session           : 09.30 - 13.00 WIB

Tracking Session      : 13.00 - 16-30 WIB

Tempat                     : Raffles Hotel Jakarta, Ciputra World, Jl. Prof. DR. Satrio Kav 3 – 5, Jakarta Selatan.


Bergabunglah bersama kami dalam acara FORTINET Accelerate Asia 2023 dan dapatkan informasi bagaimana Fortinet memberikan visibilitas yang belum pernah ada sebelumnya dan bertemu para ahli FORTINET untuk mempelajari cara menerapkan Zero Trust, SASE, Hybrid Mesh Firewall, dan Automated SOC anda.


Karena tempat terbatas, segera registrasikan diri anda melalui tautan berikut: http://bit.ly/Fortinet-Accelerate2023


Acara ini free of charge (tidak dipungut biaya) serta dapat diikuti oleh 5 orang dalam 1 perusahaan 


Terima Kasih, 

Fortinet

Read More »

Selasa, 31 Mei 2022

Error: Could not access network location components when installing Citrix web plug-in version 11.2 or higher

 This error appears when trying to install the Citrix web plug-in version 11.2 or higher.

Answer:

Note : Incorrect changes to registry settings can cause serious system problems that may be irreversible without reinstallation of the operating system. You must back up your registry before making any registry changes. We are not responsible for damage resulting from incorrect use of the Registry Editor.
  1. Click Start > Run and type in "regedit" and click ok
  2. Browse to HKEY_LOCAL_MACHINE > Software > Mozilla and rename this key
  3. Browse to KHEY_CURRENT_USER > Software > Mozilla and rename this key
  4. Launch the Citrix Web Plug-in installer
  5. Once complete, go back into the Registry Editor and remove previous changes to the keys mentioned in steps 2&3

Source : Blackbaud
Read More »

Senin, 15 Maret 2021

User CUCM cannot access CUCM Self Portal

Tadi pagi dapat info dari teman yang standby di kantor, bahwa ada user yang tidak bisa mengakses url CCM User miliknya untuk menambahkan speed dials. Informasi yang di peroleh, bahwa tidak ada hak akses untuk user tersebut.


Saat ini di kantor menggunakan CUCM versi 11.


Dari error diatas, diketahui bahwa sepertinya user yang dimaksud tidak memiliki groups CCM End User. Dan benar saja, ketika di cek tidak ada group tersebut.


Langsung saja gue infokan ke teman untuk menambahkan group CCM User, dan akhirnya user tersebut sudah bisa mengakses laman dari user portalnya sendiri.


Read More »

Minggu, 14 Maret 2021

Membuat prioritas bandwidth untuk Zoom di Mikrotik

* Membuat address list server zoom, server zoom menggunakan port 3478,3479,5090,5091,8801-8810, jadi kita tandai dahulu koneksi yang menggunakan port tersebut dan ip tujuannya disimpan kedalam address list.

 /ip firewall mangle

add chain=prerouting dst-address-list=!zoom_ip dst-port=3478,3479,5090,5091,8801-8810 protocol=tcp action=add-dst-to-address-list address-list=zoom_ip;

add chain=prerouting dst-address-list=!zoom_ip dst-port=3478,3479,5090,5091,8801-8810 protocol=udp action=add-dst-to-address-list address-list=zoom_ip;


* Menandai setiap koneksi baru yang menggunakan akses ke port 3478,3479,5090,5091,8801-8810 baik tcp ataupun udp.

/ip firewall mangle

add chain=prerouting protocol=tcp dst-port=3478,3479,5090,5091,8801-8810 action=mark-connection new-connection-mark=koneksi_zoom passthrough=yes;

add chain=prerouting protocol=udp dst-port=3478,3479,5090,5091,8801-8810 action=mark-connection new-connection-mark=koneksi_zoom passthrough=yes;


* Menandai port 80 atau 443 yang digunakan oleh address list Zoom.

/ip firewall mangle 

add chain=prerouting protocol=tcp dst-port=80,443 dst-address-list=zoom_ip action=mark-connection new-connection-mark=koneksi_zoom passthrough=yes


* Menandai Packet Zoom, menggunakan tanda zoom koneksi yang sebelumnya dibuat diatas. Tanda Packet ini yang nantinya akan kita pergunakan untuk dibuat bandwidth managementnya

/ip firewall mangle

add chain=forward action=mark-packet connection-mark=koneksi_zoom new-packet-mark=paket_zoom passthrough=no

* Membuat queue 

/queue simple  

add name="Queue ZOOM" target=10.88.44.0/24 parent=none packet-marks=paket_zoom priority=1/8 queue=default-small/default-small limit-at=0/0 max-limit=100M/100M burst-limit=0/0 burst-threshold=0/0 burst-time=0s/0s bucket-size=0.1/0.1 

add name="LAN" target=10.88.44.0/24 parent=none packet-marks="" priority=8/8 queue=default-small/default-small limit-at=0/0 max-limit=100M/100M burst-limit=0/0 burst-threshold=0/0 burst-time=0s/0s bucket-size=0.1/0.1 


Read More »

Senin, 26 Oktober 2020

Kolom Microsoft Excel berubah menjadi Angka

 Hai,

Sudah lama ternyata tidak membuat tulisan di blog ini. Sampai akhirnya blog ini mulai seperti mati suri.

Sebagai tulisan pertama gue setelah hiatus, gue mau share kejadian tadi di kantor.

Tadi pagi ada sesebapak atasan yang manggil gue untuk dilakukan pengecekan terhadap aplikasi Microsoft Excel beliau. Keluhannya adalah formula Excelnya error dan karena beliau juga ga fasih bahasa indonesia dan gue pun ga fasih bahasa bapak itu, akhirnya kita diskusi dengan bahasa bahu. wkwkwk.....

Setelah dicek, ternyata error yang dimaksud adalah sebagai berikut :


Terlihat bahwa Formula penjumlahan yang ditampilkan menggunakan format R1C1 Style.

Langsung ga pake lama, gue lakuin ini :

  1. Buka Tab File, Pilih Options.
  2. Di menu Options, pilih Tab Formula
  3.  Pada menu Working with Formulas, matikan ceklis pada pilihan R1C1 reference style.


dan Voila,, Microsoft Excelnya kembali normal dengan tampilan seperti biasa.


CMIIW

Read More »

Rabu, 16 Oktober 2019

HYPER-V : Device eth0 does not seem to be present, delaying initialization

Pagi-pagi gue mendapat telepon dari team Customer Service ISP yang dipakai oleh kantor, menginformasikan kalau mailserver milik kantor terdeteksi mati. Bergegas gue lakukan pengecekan, setelah terhubung dengan server host Hyper-V, gue coba cari status dari mailserver gue

# ifconfig

dan ditemukan kondisi bahwa tidak ada interface ethernet yang dipakai saat ini.

 lo Link encap:Local Loopback
 inet addr:127.0.0.1 Mask:255.0.0.0
 inet6 addr: ::1/128 Scope:Host
 UP LOOPBACK RUNNING MTU:65536 Metric:1
 RX packets:0 errors:0 dropped:0 overruns:0 frame:0
 TX packets:0 errors:0 dropped:0 overruns:0 carrier:0
 collisions:0 txqueuelen:0
 RX bytes:0 (0.0 b) TX bytes:0 (0.0 b)


Kemudian gue coba lakukan restart service

# service network restart

hasilnya malah mendapatkan pesan ini

Bringing up interface eth0: Device eth0 does not seem to be present, delaying initialization


Asumsi gue, interface ethernet ini mati. Gue langsung coba untuk menyalakan kembali dengan menggunakan perintah

# ifup eth0

masih mendapat pesan yang sama

Device eth0 does not seem to be present, delaying initialization

Ternyata masalah ini terjadi karena MAC Address yang di pergunakan failed.  solusinya cukup mudah yaitu mengganti MAC Address untuk Server ini dari sebelumya dynamic menjadi static.


Read More »

Kamis, 27 Juni 2019

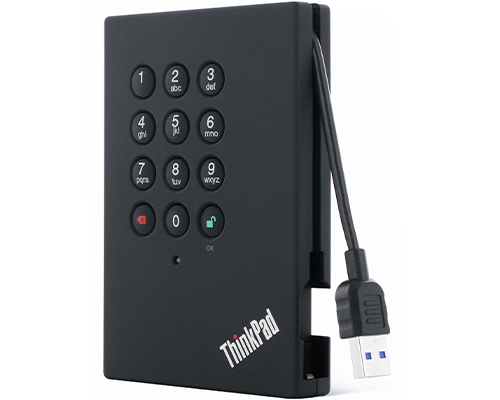
IBM Thinkpad Secure Drive Red Blinking

I have a task from my user about his Thinkpad secure drive. The Secure Drive is look like the picture below.


His Secure Drive always show blinking red repeatedly, and he cannot input the password to unlocke well. From first impression, this conditions means the secure drive come into locked mode. and i think it's cause by he always put the worng password over and over again.

To get into unlocked mode, i do the following action :

1. Disconnect the secure hard drive from your computer.
2. Hold 5 while reconnecting the secure hard drive to your computer. The status LED alternately flashes in red and in green.

3. Press 5278879 and Press OK. The status LED turns red, indicating that the secure hard drive is unlocked for additional password attempts.


For further informastion, it can read at this documents.


CMIIW

Read More »

Rabu, 10 Januari 2018

Tidak bisa Install Printer di Windows 10 - The hash for the file is not present in the specified catalog file.

Gue mengalami masalah ketika melakukan instalasi driver printer yang sudah cukup lama di OS Microsoft Windows 10, dimana ketika proses instalasi mencapai installing printer, selalu tampil semacam EULA dari windows yang menginformasikan adanya perubahan di sistem. ketika gue tekan pilihan "YES", selalu tampil pesan seperti ini :

Windows encountered a problem installing the driver software for your device.Windows found driver software for your device but encoutered an error while attempting to install it.The hash for the file is not present in the specified catalog file. The file is likely corrupt or the victim of tampering.

Setelah dilakukan ujicoba secara brutal, gue menemukan kesimpulan bahwa masalah ini terjadi karena Windows mencegah instalasi aplikasi yang tidak terpercaya (dalam hal ini driver printer sudah cukup tua). Fitur ini sudah ada sebenarnya sejak windows 8, yang bernama "Device Driver Signing", dan setelah gue cari-cari di beberapa forum komunitas IT, gue temukan solusinya dibawah ini.


  1. Tekan tombol "Start"
  2. Ketikkan “startup”.
  3. Pilih “Change advanced startup settings“.
  4. Pilih “Restart now” pada bagian “Advanced startup” 
  5. Kemudian komputer akan restart, dan menampilkan menu "advanced startup"
  6. Pilih “Troubleshoot“.
  7. Pilih “Advanced Options“.
  8. Pilih “Startup Options“.
  9. Pilih “Restart“.
  10. Komputer akan kembali restart, dan akan menampilkan menu lebih lanjut
  11. Setelah menu tampil, pilih angka "7" untuk memilih “Disable driver signing enforcement“.
Setelah gue lakukan hal diatas, printer tersebut sudah sukses diinstall di notebook baru ini. Dan sudah siap tempur di user.
Read More »

Selasa, 16 Mei 2017

Fatal error C0000034 applying update operation xxx of .....

Dampak dari serangan masif ransomware yang bernama WannaCrypt, membuat gue harus berangkat pagi-pagi ke kantor untuk melakukan instalasi patch pada komputer user yang berbasis Micrososft Windows.

Dari sekian banyak komputer berupa desktop dan laptop, ada sebuah kendala yang menurut gue cukup unik sehingga perlu gue catat agar tidak lupa kalau terjadi kembali. Kendala tersebut adalah munculnya pesan "Fatal error C0000034 applying update operation ................" yang terjadi saat windows restart setelah selesai melakukan update.

Setelah gue lakukan pencarian, gue menemukan kasus serupa yang diajukan disebuah forum milik Microsoft. Langsung aja gue kutip dari situs tersebut cara penanganannya.

When applying SP1 for windows 7 there is a specific error that can happen during reboot. If you get this error “Fatal Error C0000034 Applying Update Operation 282 of...”, follow the steps below to fix the SP1 installation
1. Reboot your computer while it’s starting up.
2. When your computer starts up again, choose the option “Launch Startup Repair”"If you do not have this module installed in the OS, you'll need a Win7 install disc that is the same architecture (i.e. 32 or 64-bit) as the OS installed. Just boot to the CD and go from there."
3.When the Startup repair starts, click cancel.
4. After you click cancel it will show a box. Click “Don’t Send”, then click the link “View advanced options for recovery and support”
5. In the new window click Command Prompt at the bottom.
6. In Command Prompt type this and press enter: %windir%\system32\notepad.exe
7. Notepad will open. In notepad go to File - Open.
8. Change the type of files notepad views from .txt to All Files
9. Now in Notepad, go to C:\Windows\winsxs\ (or whichever drive Windows is installed on)
10. In that folder, find pending.xml and make a copy of it"Just copy and paste it in the same folder, this is just in case something happens to the original so you don't lose it."
11. Now open the original pending.xml"It will usually take a while to load because it's a huge file."
12. Press CNTRL+F and search for the following exactly: 0000000000000000.cdf-ms
"That's sixteen (16) zeroes ;)"
13. Delete the following text (yours may be a little different):


"NOTE: Your PC might not have all 3 sections of code (, , ). Just make sure you delete section “Checkpoint” and whatever other sections have “000000000000000.cdf-ms”. They will be right next to eachother."
14. Save the file, close notepad, close command prompt, restart your computer.

Sumber : di sini


Read More »

Jumat, 12 Mei 2017

Enable RPC HTTP di Microsoft Outlook 2016

I have a task from user that he complained about his Microsoft Outlook cannot be use while out of office. After checking his notebook, i found that he installed Microsoft Office 2016 from Office 365. And finally found this issue caused by his Microsoft Outlook not properly setup.

From googling, i found microsoft support released a documentation that MS. Exhcange  2016 is using MAPI over HTTP not like previous version that using RPC over HTTP.
and i get suggestion to do the following :

1. Open Registry editor Windows
2. Search the following key 
"HKEY_CURRENT_USER\Software\Microsoft\Exchange"
3. At the right pane, will show you DWORD "MapiHttpDisabled", Right click at that DWORD and select modify.
4. Change the value from "1" into "0".
5. Close Regedit
6. Open the Microsoft Outlook.

CMIIW
Read More »

Senin, 06 Februari 2017

MS. Exchange 2013 - You don't have permission to perform this action - Stuck in draft Folder OWA

My client said they cannot sent any E-mail and stuck in draft folder when they are using OWA. It's also give an error "You don't have permission to perform this action". They have troubleshoot for  whole day and found no idea to resolve it.

When I started looking at the issue, I went through series of basic transport troubleshooting steps for Exchange 2013 multirole server, such as checking all transport related services, possible back pressure issue, and state of all server components. Of course, there is nothing wrong with them.

Running out of ideas, I checked settings of send connector, just to make sure there is nothing out of ordinary. I see this in Send Connector properties,


There are no reason to use external DNS, For this environment, it's not needed as well. I've unthick the box but the problem still exists. 

I then run get-TransportService | fl *dns* to make sure that we don’t have any external DNS settings configured.


Ooops, there are external DNS Server setting. I run several NSLOOKUP test and found DNS server did not respon any queries. I think this is the problem cause.

To remove it, you have to run 

Set-TransportService -ExternalDNSAdapterEnabled $true -ExternalDNSServers $null

After restarting the transport service, all mails in the Draft folder are gone. Mail flow is restored!

Note :

If this action did not solve the issue, try to disable your Antivirus that installed on your Server. Sometimes, Antivirus blocked Microsoft Exchange services and will cause this issue.

Read More »

Minggu, 25 Desember 2016

Tidak bisa terima email dari luar domain, Email Deferred due maximum connection

Jumat kemarin, Salah seorang temen IT salah satu perusahaan yang berkantor di gedung tempat gue kerja bertanya sama gue. Dia ada masalah tidak dapat menerima email dari luar domain. Setelah gue coba lakukan analisa dan sedikit pemeriksaan, gue temukan informasi bahwa email yang gue kirim sudah sukses di terima oleh MX yang disetup untuk domain perusahannya. Dan gue menyarankan agar menghubungi ISP yang dipakai untuk meminta pengecekan log email, mengingat MX tersebut ternyata dikelola ISP.

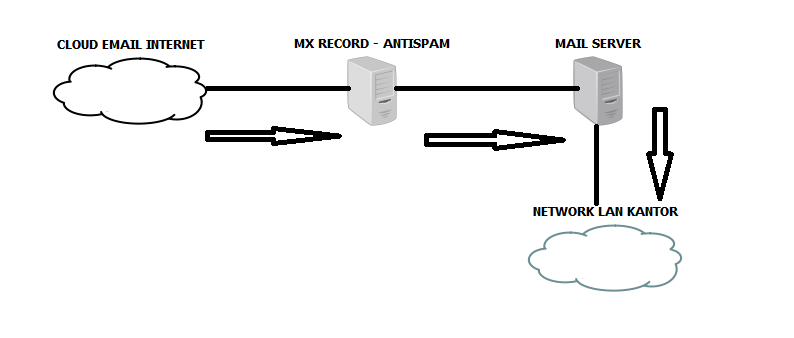
Selang beberapa jam, gue kembali dihubungi oleh temen gue. diinformasilan bahwa hasil pengecekan dari ISPnya adalah tidak ada gangguan dalam route email yang dipergunakan, Namun memang terjadi bottle neck sehingga email menjadi tertahan. Email tertahan karena melebihi kuota penerimaan email yang telah ditetapkan dalam sekali session. Setelah gue tanyakan lebih lanjut, ternyata routing email seluruhnya diarahkan ke ISP dahulu sebagai AntiSpam dan Antivirus, baru kemudian diteruskan ke Mail Servernya (Kebetulan MailServernya menggunakan Microsoft Exchange 2013). Mungkin seperti gambar dibawah ini untuk penjelasan ilustrasinya.

Dari penjelasan tersebut, mulai masuk akal lah kenapa bisa terjadi masalah tersebut. Masalah ini terjadi karena Mail Server hanya menerima email dari MX RECORD sehingga apabila terjadi gangguan Jaringan/Sistem MAIL SERVER (dimana pada hari sebelumnya terjadi gangguan service pada Microsoft Exchangenya). Maka akan terbentuk antrian yang cukup banyak karena default dari Microsoft Exchange hanya di set sebanyak 20 Inbound sekali session.

Untuk mengatasi hal tersebut, maka perlu dilakukan penyeseuaian terhadap konfigurasi Inboundconnection dari Microsoft Exchangenya. Dan gue menyarankan agar dilakukan sebagai berikut :

1. Buka windows Power Shell
2. Cek dahulu settingan pada konfigurasi receive connector. Kalau gue biasanya menggunakan perintah "Get-receiveconnector | ft". (karena biasanya gue tidak mengetahui nama connector yang dibuat oleh konsultan).
3. Cek konfigurasi konektor yang dipakai, gue menggunakan perintah "Get-receiveconnector -identity "namaserver\nama_receive_connector" | fl"
4. Lihat konfigurasi pada bagian "MaxInboundConnection" dan "MaxInboundConnectionPerSource". Default 2 konfigurasi ini biasanya memiliki nilai 20. Dan bagian ini yang akan kita perbesar.
5. Ubah konfigurasinya menggunakan perintah "Set-ReceiveConnector -identity "namaserver\nama_receive_connector" -maxinboundconnection 5000 -maxinboundconnectionpersource 100". (sebenarnya bisa kita set menjadi unlimited, namun gue tidak menyarankan karena alasan SPAM).
6. Coba cek kembali status antrian emailnya.


Sumber : dari sini dan disini


Read More »

Senin, 05 Desember 2016

Konfigurasi DC dengan NTP Server Eksternal

Belakangan ini ada yang aneh dengan jam-jam yang ditunjukkan oleh komputer client dan Telepon di kantor. Setelah gue selidiki, ternyata jam yang dipergunakan melenceng lebih dari 5 menit dari jam yang seharusnya di Server AD. Dan akhirnya terpaksa dilakukan sync manual antara komputer client dengan AD.

Namun setelah pengecekan lebih lanjut, ternyata jam di server AD pun menggunakan local CMOS dan tidak melakukan sync ke server NTP.


Untuk menghindari hal-hal yang mungkin kurang diinginkan dikemudian hari, gue lakukan sinkronisasi dengan server NTP milik pool.ntp.org. Langkah-langkah yang gue lakukan adalah sebagai berikut :

1. login kedalam Server DC yang memiliki role sebagai PDC. Untuk melakukan pengecekan role server lakukan dengan perintah "netdom query fsmo"
2. Buka command prompt dengan level administrator
3. Tambahkan peer server yang ingin dipergunakan dengan perintah w32tm /config /manualpeerlist:"1.id.pool.ntp.org,0x1 1.asia.pool.ntp.org,0x1 3.asia.pool.ntp.org,0x1"
4. Agar Server DC ini menjadi sumber yang dapat dipergunakan, tambahkan perintah berikut "w32tm /config /reliable:yes"
5. Restart service "net stop w32time && net start w32time"

6. Cek status dengan "w32tm /query /status"

Beberapa perintah lain yang mungkin membantu ketika melakukan konfigurasi ini :

a. Memaksa proses sinkronisasi seketika
w32tm /resync /nowait

b. Cek konfigurasi NTP
w32tm /query /configuration

c. Menampilkan sumber NTP
w32tm /query /source 

d. Menampilkan konfigurasi Peer NTP dan Statusnya
w32tm /query /peers


Read More »

Selasa, 13 September 2016

Cara mengecek kapan Account di buat dalam Active Directory

Bagaimanakah cara untuk melakukan pengecekan kapan suatu account dalam Active Directory dibuat?

Untuk melakukan hal ini, harap dipastikan bahwa module active directory sudah diinstall dalam shell

1. Untuk menginstall module active directory 
  • buka windows shell
  • ketikkan perintah "get-module -listavailable" untuk melihat module apa saja yang sudah terinstall.
  • apabila module Active Directory belum ada, gunakan perintah "import-module activedirectory" dan biarkan sistem menginstall module tersebut.
2. Untuk mengecek kapan sebuat account dalam AD dibuat, gunakan perintah ini
Get-ADUser -Identity your-account -Properties whenCreated
 dan hasilnya akan seperti berikut


Terlihat bahwa account gue dibuat pada tanggal 5 April 2011 pukul 11:04 am.
Read More »

Minggu, 31 Juli 2016

Cek Performa network? pilih SPEEDTEST atau NPERF atau OPENSIGNAL

tulisan ini masih memiliki kaitan dengan tulisan sebelumnya di situs ini

Bagaimana memastikan bahwa kecepatan internet kita itu sesuai dengan layanan yang disewa?

Mungkin itulah pertanyaan yang mayoritas ada dari pengguna internet khususnya internet broadband di Indonesia. Mulai dari pelanggan paket data (yang katanya) unlimited hingga pelanggan fixed access di rumah-rumah.

Kali ini gue akan mencoba sedikit berbagi mengenai beberapa aplikasi yang dapat dipergunakan untuk mengetahui kecepatan internet yang saat ini disewa, bahkan ada aplikasi lain yang memberikan informasi lain yang mungkin dapat memberikan informasi untuk proses "security issue" :)

1. SPEEDTEST
Aplikasi ini sangat terkenal dikalangan pengguna internet. Bahkan sering dijadikan sebagai acuan untuk membandingkan kecepatan internet. Walaupun sebenarnya mematok aplikasi ini sebagai acuan utama sungguh sangat tidak bijaksana, mengingat kecepatan internet itu berbanding dengan konsumsi internet dan traffic yang saat ini terjadi. Aplikasi ini sangat simpel, karena hanya menampilkan berapa besar kecepatan upload dan download yang didapat oleh pengguna.


2. NPERF
Aplikasi ini adalah pilihan favorit gue untuk mengecek kecepatan internet yang dipakai. Karena selain pilihan untuk test kecepatan internet, aplikasi ini juga dilengkapi dengan alat untuk melakukan pengecekan kualitas streaming, kecepatan buka situs dan benchmark ISP. Aplikasi ini juga dilengkapi dengan fitur pengecekan sinyal dan kualitas HDSPA dari provider paket data kita. Sehingga dapat memberikan gambaran provider mana yang sebaiknya dipakai di suatu daerah tertentu.


3. OPEN SIGNAL
Aplikasi ini juga salah satu aplikasi favorit gue, karena selain untuk melakukan pengecekan kecepatan internet, juga dapat memberikan gambaran informasi tentang provider GSM yang dipakai. Fitur utama juga hampir sama dengan NPERF, namun titik beratnya lebih kepada jaringan HSDPA.


Jadi, Apakah pilihan anda??
Read More »